Showing posts sorted by date for query wxPerl GUI twitter. Sort by relevance Show all posts

Wednesday, June 10, 2009

Adding a menu bar to the twitter GUI: part 5

Updating to the new Net::Twitter::Lite API
Marc Mims updated the API of his twitter's interface module for Perl.
There are two versions:

In order to use the Lite version (largely sufficient for my modest needs), only trivial changes are needed in the twit_GUI.pl script:
  • replace use Net::Twitter by use Net::Twitter::Lite (duh!)
  • replace calls to Net::Twitter->new() by calls to Net::Twitter::Lite->new()
This ensures that I am now using a module that is actively supported.

Adding a menu bar
A menu bar can only be added to a Frame. According to the wxPerl docs,

A frame is a window whose size and position can (usually) be changed by the user. It usually has thick borders and a title bar, and can optionally contain a menu bar, toolbar and status bar. A frame can contain any window that is not a frame or dialog.
So, let's replace the Dialog occurences with Frame in the script.
The MyApp modules becomes:

##############################################################################
#
package MyApp;
#
##############################################################################
use vars qw(@ISA);
@ISA=qw(Wx::App); # this tells Perl to look for unknown methods in the Wx::App module

use Wx qw(wxDefaultSize wxDefaultPosition);

sub OnInit {
my($this) = @_;
my $frame = MyFrame->new('Twit', wxDefaultPosition);
# set it as top window (so the app will automatically close when
# the last top window is closed)
$this->SetTopWindow($frame);
$frame->Show(1);
1;
}

package MyDialog becomes package MyFrame:
##############################################################################
#
package MyFrame;
#
##############################################################################
use vars qw(@ISA);

@ISA=qw(Wx::Frame);

use Wx::Event qw(EVT_BUTTON EVT_CLOSE EVT_TEXT EVT_TEXT_MAXLEN);
use Wx qw(:sizer
:statictext
wxDefaultPosition
wxDefaultSize
wxDefaultValidator
wxDEFAULT_DIALOG_STYLE
wxID_OK
wxOK
wxRESIZE_BORDER
wxTE_MULTILINE
);

use constant MAX_POST_LENGTH => 140;

sub new {
my $class = shift;
my $password_file;

# Main window
my $form_width = 480;
my $form_height = 195;
# Array of line numbers used on the dialog window
my @ylines = (0, 10, 20, 40, 80, 100);

my $this = $class->SUPER::new(
undef, # parent
-1, # id
$_[0], # title
$_[1], # position [x, y]
[$form_width, $form_height] # size [width, height]
);

# Display the Wx icon on the application window
$this->SetIcon(Wx::GetWxPerlIcon());

#--------------------------------------------------------------------------
# Menu Bar
#--------------------------------------------------------------------------
my $file_menu = Wx::Menu->new('');
my $menu_bar = Wx::MenuBar->new();
$menu_bar->Append($file_menu, '&File');
$this->SetMenuBar($menu_bar);
...
Increase the form height by 10 pixels (up to 195) to make room for the menu bar.
And... voilĂ !

First version of twit script using wxperlEr... not too pretty, let's go back to the doc. Oh wait, what is that about panels?
A panel is a window on which controls are placed. It is usually placed within a frame. It contains minimal extra functionality over and above its parent class wxWindow; its main purpose is to be similar in appearance and functionality to a dialog, but with the flexibility of having any window as a parent.
Ah ah! The trick is to place a wxPanel object inside the frame and then relate every existing GUI element to this panel as the parent window. Previously, all the elements (button, text dialog, etc.) had the wxFrame as a parent window, hence the dark grey background. Just add this line before the Menu Bar code:
    # Create a panel where to place GUI elements
my $panel = Wx::Panel->new($this, -1);
and replace the $this argument by $panel everywhere you need to set the parent ID.

Now we've got a menu bar element. You can fill it by appending menu elements to it as is shown in the code below. Each menu element can be appended in turn with menu options. The wxFrame::SetMenuBar() method displays a given menu bar.
    #--------------------------------------------------------------------------
# Menu Bar
#--------------------------------------------------------------------------
my $menu_bar = Wx::MenuBar->new();

my $file_menu = Wx::Menu->new();
$file_menu->Append(11, 'E&xit');
$menu_bar->Append($file_menu, '&File');

my $help_menu = Wx::Menu->new();
$help_menu->Append(21, '&About');
$menu_bar->Append($help_menu, '&Help');

# wxFrame method to show a given menu bar
$this->SetMenuBar($menu_bar);
The & in the string (eg: 'E&xit') shows what shortcut will be used in combination with the Alt key (eg: Alt + x for 'E&xit').
To link an event with a menu selection, use the EVT_MENU event:
    EVT_MENU($this, 11, \&OnQuit);
EVT_MENU($this, 21, \&OnAbout)
The callback methods can be implemented as such:
sub OnQuit {
my $this = shift;
$this->Close( 1 );
}

sub OnAbout {
my $this = shift;
use Wx qw(wxOK wxCENTRE);
Wx::MessageBox("twit_GUI $VERSION\n$version_date\n(c)DamienLearnsPerl", # text
"About", # title bar
wxOK|wxCENTRE, # buttons to display on form
$this # parent
);
}
End result under Vista? Tadaaa!
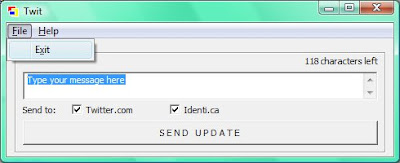
Improvement layout using panelsNext step:
- Load/save password files

Find the whole new source code here.

Adding a menu bar to the twitter GUI: part 5

Updating to the new Net::Twitter::Lite API
Marc Mims updated the API of his twitter's interface module for Perl.
There are two versions:

In order to use the Lite version (largely sufficient for my modest needs), only trivial changes are needed in the twit_GUI.pl script:
  • replace use Net::Twitter by use Net::Twitter::Lite (duh!)
  • replace calls to Net::Twitter->new() by calls to Net::Twitter::Lite->new()
This ensures that I am now using a module that is actively supported.

Adding a menu bar
A menu bar can only be added to a Frame. According to the wxPerl docs,

A frame is a window whose size and position can (usually) be changed by the user. It usually has thick borders and a title bar, and can optionally contain a menu bar, toolbar and status bar. A frame can contain any window that is not a frame or dialog.
So, let's replace the Dialog occurences with Frame in the script.
The MyApp modules becomes:

##############################################################################
#
package MyApp;
#
##############################################################################
use vars qw(@ISA);
@ISA=qw(Wx::App);   # this tells Perl to look for unknown methods in the Wx::App module

use Wx qw(wxDefaultSize wxDefaultPosition);

sub OnInit {
    my($this) = @_;
    my $frame = MyFrame->new('Twit', wxDefaultPosition);
    # set it as top window (so the app will automatically close when 
    # the last top window is closed)
    $this->SetTopWindow($frame);
    $frame->Show(1);
    1;
}

package MyDialog becomes package MyFrame:
##############################################################################
#
package MyFrame;
#
##############################################################################
use vars qw(@ISA);

@ISA=qw(Wx::Frame);

use Wx::Event qw(EVT_BUTTON EVT_CLOSE EVT_TEXT EVT_TEXT_MAXLEN);
use Wx qw(:sizer
          :statictext
          wxDefaultPosition
          wxDefaultSize
          wxDefaultValidator
          wxDEFAULT_DIALOG_STYLE
          wxID_OK
          wxOK
          wxRESIZE_BORDER
          wxTE_MULTILINE
          );

use constant MAX_POST_LENGTH => 140;

sub new {
    my $class = shift;
    my $password_file;

    # Main window
    my $form_width  = 480;
    my $form_height = 195;
    # Array of line numbers used on the dialog window
    my @ylines = (0, 10, 20, 40, 80, 100);

    my $this = $class->SUPER::new(
                            undef,  # parent
                            -1,     # id
                            $_[0],  # title
                            $_[1],  # position [x, y]
                           [$form_width, $form_height] # size [width, height]
                           );

    # Display the Wx icon on the application window
    $this->SetIcon(Wx::GetWxPerlIcon());

    #--------------------------------------------------------------------------
    # Menu Bar
    #--------------------------------------------------------------------------     
    my $file_menu = Wx::Menu->new('');
    my $menu_bar = Wx::MenuBar->new();
    $menu_bar->Append($file_menu, '&File');
    $this->SetMenuBar($menu_bar);
    ...
Increase the form height by 10 pixels (up to 195) to make room for the menu bar.
And... voilĂ !

First version of twit script using wxperlEr... not too pretty, let's go back to the doc. Oh wait, what is that about panels?
A panel is a window on which controls are placed. It is usually placed within a frame. It contains minimal extra functionality over and above its parent class wxWindow; its main purpose is to be similar in appearance and functionality to a dialog, but with the flexibility of having any window as a parent.
Ah ah! The trick is to place a wxPanel object inside the frame and then relate every existing GUI element to this panel as the parent window. Previously, all the elements (button, text dialog, etc.) had the wxFrame as a parent window, hence the dark grey background. Just add this line before the Menu Bar code:
    # Create a panel where to place GUI elements
    my $panel = Wx::Panel->new($this, -1);
and replace the $this argument by $panel everywhere you need to set the parent ID.

Now we've got a menu bar element. You can fill it by appending menu elements to it as is shown in the code below. Each menu element can be appended in turn with menu options. The wxFrame::SetMenuBar() method displays a given menu bar.
    #--------------------------------------------------------------------------
    # Menu Bar
    #-------------------------------------------------------------------------- 
    my $menu_bar = Wx::MenuBar->new();

    my $file_menu = Wx::Menu->new(); 
    $file_menu->Append(11, 'E&xit');
    $menu_bar->Append($file_menu, '&File');
 
    my $help_menu = Wx::Menu->new();
    $help_menu->Append(21, '&About');
    $menu_bar->Append($help_menu, '&Help');

    # wxFrame method to show a given menu bar
    $this->SetMenuBar($menu_bar);
The & in the string (eg: 'E&xit') shows what shortcut will be used in combination with the Alt key (eg: Alt + x for 'E&xit').
To link an event with a menu selection, use the EVT_MENU event:
    EVT_MENU($this, 11, \&OnQuit);
    EVT_MENU($this, 21, \&OnAbout)
The callback methods can be implemented as such:
sub OnQuit {
    my $this = shift;
    $this->Close( 1 );
}

sub OnAbout {
    my $this = shift;
    use Wx qw(wxOK wxCENTRE);
    Wx::MessageBox("twit_GUI $VERSION\n$version_date\n(c)DamienLearnsPerl",  # text
                   "About",                   # title bar
                   wxOK|wxCENTRE,             # buttons to display on form
                   $this                      # parent
                   );          
}
End result under Vista? Tadaaa!

Improvement layout using panelsNext step:
- Load/save password files

Find the whole new source code here.

Sunday, May 17, 2009

Adding a wxPerl GUI to the twitter script: part 4 - Putting it all together

Note: this article is part of a series.

Today I've finished version 1.0.0 of twit_GUI.pl. Nothing fancy, I just added the Net:Twitter part from the console version of twit.pl to the existing User Interface. I can now post to twitter.com or identi.ca from a graphical interface Perl program. That's how cool I am.

New since version 0.0.2
I removed the event handling on EVT_TEXT_MAXLEN because I realized that I didn't need to display a message when I reached 140 characters. The fact that you cannot type anything after the limit is enough. Keeping the message would have been annoying in fact...

A "gentle" analysis from Perl::Critic made me change the way I was calling the open function.
Before:
open(LOGINFILE, $password_file)
After:
open(my $logfile_handle, '<', $password_file)

Explanation:
- The LOGINFILE file handle is dangerous because as such, LOGINFILE is declared as a global. It could already be used as another file's handle.
- The '<' second argument indicates that the file is open in read-only mode. It is easier to see that than in the previous writing and it avoids bugs for file names starting with '<' or '>' (see the full explanation).

I also replaced the double quotes (") by single quotes (') everywhere variable interpolation was not needed.
Speaking about quotes, I removed those surrounding the identifiers of the hash elements.
Speaking about hashes, I really enjoy how flexible they can be used for structuring your data. Take for example the %login hash in $this->{login}. It lets me organize data as such:

%login = {
user_name => { twitter => "Twitter.com user name",
identica => "Identica user name"
},
password => { twitter => "Twitter.com password",
identica => "Identica password"
}
}
And I can add to the hash construct as I need it. Of course, if not documented, I can see that hashes contructed in this manner could get pretty tough to maintain.

What's next?
There are improvements to be made to the twit_GUI script, especially concerning the password handling. Today I have a hard-coded path inside the script which is very ugly. I am not proud of myself but the Perl Iron Man's deadline is arriving soon and I want to stay in the contest ;)
I will apply the finishing touch in a next post.

I am not sure if I should keep the POD comments. I was thinking about throwing it all inside an "About" menu item. Maybe I can display the POD info directly in a MessageBox, in a reentrant fashion.

I will not plaster the walls of this blog with yet another listing but as always you can find all script versions on the DamienLearnsPerl's companion site.


Adding a wxPerl GUI to the twitter script: part 4 - Putting it all together

Note: this article is part of a series.

Today I've finished version 1.0.0 of twit_GUI.pl. Nothing fancy, I just added the Net:Twitter part from the console version of twit.pl to the existing User Interface. I can now post to twitter.com or identi.ca from a graphical interface Perl program. That's how cool I am.

New since version 0.0.2
I removed the event handling on EVT_TEXT_MAXLEN because I realized that I didn't need to display a message when I reached 140 characters. The fact that you cannot type anything after the limit is enough. Keeping the message would have been annoying in fact...

A "gentle" analysis from Perl::Critic made me change the way I was calling the open function.
Before:
open(LOGINFILE, $password_file)
After:
open(my $logfile_handle, '<', $password_file)

Explanation:
- The LOGINFILE file handle is dangerous because as such, LOGINFILE is declared as a global. It could already be used as another file's handle.
- The '<' second argument indicates that the file is open in read-only mode. It is easier to see that than in the previous writing and it avoids bugs for file names starting with '<' or '>' (see the full explanation).

I also replaced the double quotes (") by single quotes (') everywhere variable interpolation was not needed.
Speaking about quotes, I removed those surrounding the identifiers of the hash elements.
Speaking about hashes, I really enjoy how flexible they can be used for structuring your data. Take for example the %login hash in $this->{login}. It lets me organize data as such:

%login = {
user_name => { twitter => "Twitter.com user name",
identica => "Identica user name"
},
password => { twitter => "Twitter.com password",
identica => "Identica password"
}
}
And I can add to the hash construct as I need it. Of course, if not documented, I can see that hashes contructed in this manner could get pretty tough to maintain.

What's next?
There are improvements to be made to the twit_GUI script, especially concerning the password handling. Today I have a hard-coded path inside the script which is very ugly. I am not proud of myself but the Perl Iron Man's deadline is arriving soon and I want to stay in the contest ;)
I will apply the finishing touch in a next post.

I am not sure if I should keep the POD comments. I was thinking about throwing it all inside an "About" menu item. Maybe I can display the POD info directly in a MessageBox, in a reentrant fashion.

I will not plaster the walls of this blog with yet another listing but as always you can find all script versions on the DamienLearnsPerl's companion site.


Saturday, May 9, 2009

Adding a wxPerl GUI to the twitter script: part 3 - Polishing up the UI

Last time I wrote about the WxPerl twitter GUI, I made a nice little drawing about what I wanted to achieve.
The first try wasn't too far off but a few functionalities are still missing. One of them is the real-time updating of the remaining text characters (from a limit of 140). Obviously, what I need is an event on a key stroke to update the number of characters.

WxEvents documentation
Command events can be handled by macros listed in the WxWidget/WxPerl's manual under the wxCommandEvent page.
Of interest to the twitter GUI script are:

EVT_TEXT(id, func) Process a wxEVT_COMMAND_TEXT_UPDATED command, which is generated by a wxTextCtrl control.
EVT_TEXT_MAXLEN(id, func) Process a wxEVT_COMMAND_TEXT_MAXLEN command, which is generated by a wxTextCtrl control when the user tries to enter more characters into it than the limit previously set with SetMaxLength.

The first macro (EVT_TEXT) can be linked to the TextControl box where the message is being typed. Whenever a character is added or removed to the update message, the event handler will compute and display the remaining characters left before hitting the 140 limit.
The EVT_TEXT_MAXLEN macro will link the update message's TextControl to a subroutine that will be called when 140 characters have been inputted.

Code
When using WxPerl constants, the first thing to remember is to declare them at the beginning of the package.

use Wx::Event qw(EVT_BUTTON EVT_CLOSE EVT_TEXT EVT_TEXT_MAXLEN);

To find out the complete list of symbols, you can check the Wx source code in the lib/Wx/Wx_Exp.pm file located in your Perl directory. In this file, you will also be able to see all existing tags created to group related constants. For example, 'statictext' is defined as:

$EXPORT_TAGS{'statictext'} = [ qw(wxALIGN_LEFT
wxALIGN_CENTRE
wxALIGN_CENTER
wxALIGN_RIGHT
wxST_NO_AUTORESIZE
wxST_ELLIPSIZE_START
wxST_ELLIPSIZE_MIDDLE
wxST_ELLIPSIZE_END
wxST_MARKUP) ];

Writing the following line in your program:

use Wx qw(:statictext);

will import all nine constants listed above.

Coming back to our problem at hand, if we create a TextControl and StaticText objects like this

#
# Text control to enter message to twit
#
$this->{update_text} = Wx::TextCtrl->new(
$this, # parent window
-1, # control identifier
"Type your message here", # default text value
[20, $ylines[3]], # text control position [x, y]
[435, 35], # text control size [width, height]
wxTE_MULTILINE # style: wxTE_MULTILINE=The text control allows multiple lines
);

# A EVT_TEXT_MAXLEN event is generated when the number of characters in the update_text control
# reaches the maximum passed value.
$this->{update_text}->SetMaxLength(MAX_POST_LENGTH);

#
# Static text placed at the top-right position of the text control
#
Wx::StaticText->new(
$this, # parent
-1, # id
'characters left', # label
[$form_width - 95, $ylines[2]] # position [x, y]
);

#
# Static text displaying number of characters left before reaching the max amount
#
$this->{static_text}{'CharsLeft'} = Wx::StaticText->new(
$this, # parent
-1, # id
MAX_POST_LENGTH - $this->{update_text}->GetLastPosition, # label
[$form_width - 115, $ylines[2]], # position [x, y]
wxDefaultSize, # size
Wx::wxALIGN_RIGHT # style. Not implemented yet?
);

then calling the following event handlers

# Events associated to the update_text Control
# EVT_TEXT_MAXLEN is generated when the length of the Text control
# becomes larger than the value set by SetMaxLength
EVT_TEXT_MAXLEN($this, $this->{update_text}, \&MaxTextReached);

# EVT_TEXT is generated when a character is typed inside the Text control
# We use it to update the display of characters left for message
EVT_TEXT($this, $this->{update_text}, \&CountCharsLeft);

with the subroutines definition being:

sub CountCharsLeft {
my($this, $event) = @_;

# Update number of remaining characters = MAX - current text size
my $chars_left = MAX_POST_LENGTH - $this->{update_text}->GetLastPosition;
$this->{static_text}{'CharsLeft'}->SetLabel($chars_left);
}

sub MaxTextReached {
my($this, $event) = @_;

Wx::MessageBox(
"You have reached the maximum number of characters", # text
"Update too big", # title bar
wxOK, # buttons to display on form
$this # parent
);
}
then every time that {update_text} is edited, CountCharsLeft() will be called and will reset the label for {static_text}{'CharsLeft'} with the new value computed from {update_text}->GetLastPosition.
I couldn't achieve right-aligning the number of characters. From reading the Wx::Perl::Dialog source, I do not think that the style argument is supported yet.

The result?

Now one step further to accomplish my goal of being able to understand Padre's code once I put my nose in it...


Adding a wxPerl GUI to the twitter script: part 3 - Polishing up the UI

Last time I wrote about the WxPerl twitter GUI, I made a nice little drawing about what I wanted to achieve.
The first try wasn't too far off but a few functionalities are still missing. One of them is the real-time updating of the remaining text characters (from a limit of 140). Obviously, what I need is an event on a key stroke to update the number of characters.

WxEvents documentation
Command events can be handled by macros listed in the WxWidget/WxPerl's manual under the wxCommandEvent page.
Of interest to the twitter GUI script are:

EVT_TEXT(id, func) Process a wxEVT_COMMAND_TEXT_UPDATED command, which is generated by a wxTextCtrl control.
EVT_TEXT_MAXLEN(id, func) Process a wxEVT_COMMAND_TEXT_MAXLEN command, which is generated by a wxTextCtrl control when the user tries to enter more characters into it than the limit previously set with SetMaxLength.

The first macro (EVT_TEXT) can be linked to the TextControl box where the message is being typed. Whenever a character is added or removed to the update message, the event handler will compute and display the remaining characters left before hitting the 140 limit.
The EVT_TEXT_MAXLEN macro will link the update message's TextControl to a subroutine that will be called when 140 characters have been inputted.

Code
When using WxPerl constants, the first thing to remember is to declare them at the beginning of the package.

use Wx::Event qw(EVT_BUTTON EVT_CLOSE EVT_TEXT EVT_TEXT_MAXLEN);

To find out the complete list of symbols, you can check the Wx source code in the lib/Wx/Wx_Exp.pm file located in your Perl directory. In this file, you will also be able to see all existing tags created to group related constants. For example, 'statictext' is defined as:

$EXPORT_TAGS{'statictext'} = [ qw(wxALIGN_LEFT
wxALIGN_CENTRE
wxALIGN_CENTER
wxALIGN_RIGHT
wxST_NO_AUTORESIZE
wxST_ELLIPSIZE_START
wxST_ELLIPSIZE_MIDDLE
wxST_ELLIPSIZE_END
wxST_MARKUP) ];

Writing the following line in your program:

use Wx qw(:statictext);

will import all nine constants listed above.

Coming back to our problem at hand, if we create a TextControl and StaticText objects like this

#
# Text control to enter message to twit
#
$this->{update_text} = Wx::TextCtrl->new(
$this, # parent window
-1, # control identifier
"Type your message here", # default text value
[20, $ylines[3]], # text control position [x, y]
[435, 35], # text control size [width, height]
wxTE_MULTILINE # style: wxTE_MULTILINE=The text control allows multiple lines
);

# A EVT_TEXT_MAXLEN event is generated when the number of characters in the update_text control
# reaches the maximum passed value.
$this->{update_text}->SetMaxLength(MAX_POST_LENGTH);

#
# Static text placed at the top-right position of the text control
#
Wx::StaticText->new(
$this, # parent
-1, # id
'characters left', # label
[$form_width - 95, $ylines[2]] # position [x, y]
);

#
# Static text displaying number of characters left before reaching the max amount
#
$this->{static_text}{'CharsLeft'} = Wx::StaticText->new(
$this, # parent
-1, # id
MAX_POST_LENGTH - $this->{update_text}->GetLastPosition, # label
[$form_width - 115, $ylines[2]], # position [x, y]
wxDefaultSize, # size
Wx::wxALIGN_RIGHT # style. Not implemented yet?
);

then calling the following event handlers

# Events associated to the update_text Control
# EVT_TEXT_MAXLEN is generated when the length of the Text control
# becomes larger than the value set by SetMaxLength
EVT_TEXT_MAXLEN($this, $this->{update_text}, \&MaxTextReached);

# EVT_TEXT is generated when a character is typed inside the Text control
# We use it to update the display of characters left for message
EVT_TEXT($this, $this->{update_text}, \&CountCharsLeft);

with the subroutines definition being:

sub CountCharsLeft {
my($this, $event) = @_;

# Update number of remaining characters = MAX - current text size
my $chars_left = MAX_POST_LENGTH - $this->{update_text}->GetLastPosition;
$this->{static_text}{'CharsLeft'}->SetLabel($chars_left);
}

sub MaxTextReached {
my($this, $event) = @_;

Wx::MessageBox(
"You have reached the maximum number of characters", # text
"Update too big", # title bar
wxOK, # buttons to display on form
$this # parent
);
}
then every time that {update_text} is edited, CountCharsLeft() will be called and will reset the label for {static_text}{'CharsLeft'} with the new value computed from {update_text}->GetLastPosition.
I couldn't achieve right-aligning the number of characters. From reading the Wx::Perl::Dialog source, I do not think that the style argument is supported yet.

The result?

Now one step further to accomplish my goal of being able to understand Padre's code once I put my nose in it...


Wednesday, April 29, 2009

Adding a wxPerl GUI to the twitter script: part 2 - Drawing the controls

Part 2 of this series will describe how to draw the GUI elements thanks to some wxPerl magic.

wxPerl Documentation
The documentation on wxPerl is rather sparse.
The best starting points are:
  • An excellent tutorial from Jouke Visser over at Perl.com where you learn that wx stands for Windows - X to show off the portability of the library.
  • Another series of tutorials from boo_radley at perlmonks.org
  • Those tutorial and a few more are already listed on the wxPerl site
  • By clicking on this link, you will start downloading example files from the wxPerl sourceforge repository. This is a very useful resource for the first-hand demo of a lot of controls.
  • The Wx module for Perl is of course downloadable from CPAN
  • When looking at the wxWidget doc, you can transpose to the wxPerl world by knowing that "in wxPerl all classes are named Wx::Something, so wxFrame is really Wx::Frame. Static methods are called Wx::ClassName::Method(). Global function named wxFunction() are accessible as Wx::Function()." [from the wxPerl manual]
Oooh the pretty drawings...
The code listing that I present here doesn't do anything useful. It just initializes some controls and places them on an application window.
However, I'll try to explain how to find the information so we can use any control supported by wxPerl.
If you go back to my previous post on the subject, you'll be reminded that the goal is to have a window that looks like that:
GUI drawing
The first step is to actually get the main window displayed.
This is not straightforward, here's one way to do it.

#!/usr/bin/perl
use Modern::Perl;
use Wx;

...

##############################################################################
#
package MyApp;
#
##############################################################################
use vars qw(@ISA);
@ISA=qw(Wx::App); # this tells Perl to look for inkown methods in the Wx::App module

use Wx qw(wxDefaultSize wxDefaultPosition);

sub OnInit {
my($this) = @_;
my $dialog = MyDialog->new("Twit", wxDefaultPosition);
$this->SetTopWindow($dialog);
$dialog->Show(1);
1;
}
...

##############################################################################
#
package main;
#
##############################################################################

my($app) = MyApp->new();
$app->MainLoop();
There's obviously a lot of code missing but I will talk a bit about packages as it is the first time that I am confronted to them (remember, I am learning Perl). There is a perldoc page on packages. To summarize greatly, the package keyword defines the beginning of a namespace (when used as package NAMESPACE).
By the way, I didn't invent the code construct above. I found it in the wxPerl demo from the "wxPerl-0.26-samples.zip" file that you can download from the document section of the official wxPerl's download page.
In the same section, you will find a link to download the html version of the wxWidget documentation.

Line 222, we create an instance of MyApp and enter the hot loop. We will exit the loop when the MyApp object is destroyed (as a result of a click on the exit button for example).

In Package MyApp starting at line 36, the @ISA=qw(Wx::App); line tells Perl to look for unknown methods in the Wx::App module.
The Wx::App::OnInit() routine is called at the creation of a Wx::App object. It will create the application's main window.
In this function, we call the new() method of the MyDialog package/namespace that is given below:
##############################################################################
#
package MyDialog;
#
##############################################################################

use vars qw(@ISA);

@ISA=qw(Wx::Dialog);

use Wx::Event qw(EVT_BUTTON EVT_CLOSE);
use Wx qw(:sizer
wxDefaultPosition
wxDefaultSize
wxDefaultValidator
wxDEFAULT_DIALOG_STYLE
wxID_OK
wxOK
wxRESIZE_BORDER
wxTE_MULTILINE
);

use constant MAX_POST_LENGTH => 140;

sub new {
my $class = shift;

# Main window
my $form_width = 480;
my $form_height = 175;
my $yline1 = 10;
my $yline2 = 30;
my $yline3 = 70;
my $yline4 = 90;

my $this = $class->SUPER::new(
undef, # parent
-1, # id
$_[0], # title
$_[1], # position [x, y]
[$form_width, $form_height] # size [width, height]
);

# Display the Wx icon on the application window
$this->SetIcon(Wx::GetWxPerlIcon());

#--------------------------------------------------------------------------
# Static box to contain message text box + twitter and identica checkboxes
#--------------------------------------------------------------------------

# A static box is a rectangle drawn around other panel items to denote a logical grouping of items.
Wx::StaticBox->new(
$this, # parent window
-1, # window identifier (-1: default)
'Status', # text to be displayed in the static box
[10, $yline1], # window position [x, y]
[$form_width-25, 120] # checkbox size [width, height]
);

# Text control to enter message to twit
$this->{text} = Wx::TextCtrl->new(
$this, # parent window
-1, # control identifier
"Type your message here", # default text value
[20, $yline2], # text control position [x, y]
[435, 35], # text control size [width, height]
wxTE_MULTILINE # style: wxTE_MULTILINE=The text control allows multiple lines
);

# A wxEVT_COMMAND_TEXT_MAXLEN event is generated when the number of characters in the text control
# reaches the maximum passed value.
$this->{text}->SetMaxLength(MAX_POST_LENGTH);

# Static text placed in front of the twitter and identica check boxes
Wx::StaticText->new(
$this, # parent
-1, # id
'Send to:', # label
[20, $yline3] # position [x, y]
);
# twitter check box: enabled by default
$this->{checkbox}{"twitter"} = Wx::CheckBox->new(
$this, # parent
-1, # id
'Twitter.com', # label
[80, $yline3] # position [x, y]
);
# Checked by default
$this->{checkbox}{"twitter"}->SetValue(1);

# identica check box: enabled by default
$this->{checkbox}{"identica"} = Wx::CheckBox->new(
$this, # parent
-1, # id
'Identi.ca', # label
[200, $yline3] # position [x, y]
);
# Checked by default
$this->{checkbox}{"identica"}->SetValue(1);

#--------------------------------------------------------------------------
# End of static box
#--------------------------------------------------------------------------

# "Send" button
$this->{button}{"Send"} = Wx::Button->new(
$this, # parent
-1, # id
'S E N D U P D A T E', # label
[20, $yline4], # position [x,y]
[$form_width-45, 30] # size [w, h]
);

# Event associated to "Send" button
EVT_BUTTON(
$this,
$this->{button}{"Send"},
\&SendMsg
);

EVT_CLOSE(
$this,
\&OnClose
);

$this;
}

sub SendMsg {
my($this, $event) = @_;
my $twitter, my $identica;

if ($this->{checkbox}{"twitter"}->GetValue()) {
$twitter = 1;
}
else {
$twitter = 0;
}

if ($this->{checkbox}{"identica"}->GetValue()) {
$identica = 1;
}
else {
$identica = 0;
}

# For now, just display a MessageBox to test event on button press

Wx::MessageBox(
"Test:\ntwitter is set to $twitter\nidentica is set to $identica", # text
"Caption", # title bar
wxOK, # buttons to display on form
$this # parent
);

}

sub OnClose {
my($this, $event) = @_;

$this->Destroy();
}

Lots of code here but with the WxWidgets doc and my strategically placed comments, it should be easy to understand.
One thing to remember is to define each WxWidget symbol that you want to use beforehand. This is what is done on lines 63-73.
If you want to include all symbols, type
use Wx qw(:everything);
Other tags are described in this WxPerl manual's page.

Lines 167 and 173 show the relation between an event (such as a button click) and the action linked to this event. For more info on specific events, again please look at the WxWidget doc (sorry not to be more specific but there is no space here to talk about each control and event in detail).

The SendMessage() routine that is presented starting from line 181 is just there for the example. It doesn't do anything useful yet. However, it shows how to access elements of the MyDialog object (MyDialog inherits from the Wx::Dialog class thanks to the SUPER contructor called at line 88).

The end result looks like the screenshot below. Like the knick-knacks that grace Auntie Beth's shelves, it serves no purpose but it sure looks shiny:
GUI implemented with wxperlThe full twit_GUI.pl code can be found here.

Larry Wall quote of the day:
"If you remove stricture from a large Perl program currently, you're just installing delayed bugs, whereas with this feature, you're installing an instant bug that's easily fixed. Whoopee."

Adding a wxPerl GUI to the twitter script: part 2 - Drawing the controls

Part 2 of this series will describe how to draw the GUI elements thanks to some wxPerl magic.

wxPerl Documentation
The documentation on wxPerl is rather sparse.
The best starting points are:
  • An excellent tutorial from Jouke Visser over at Perl.com where you learn that wx stands for Windows - X to show off the portability of the library.
  • Another series of tutorials from boo_radley at perlmonks.org
  • Those tutorial and a few more are already listed on the wxPerl site
  • By clicking on this link, you will start downloading example files from the wxPerl sourceforge repository. This is a very useful resource for the first-hand demo of a lot of controls.
  • The Wx module for Perl is of course downloadable from CPAN
  • When looking at the wxWidget doc, you can transpose to the wxPerl world by knowing that "in wxPerl all classes are named Wx::Something, so wxFrame is really Wx::Frame. Static methods are called Wx::ClassName::Method(). Global function named wxFunction() are accessible as Wx::Function()." [from the wxPerl manual]
Oooh the pretty drawings...
The code listing that I present here doesn't do anything useful. It just initializes some controls and places them on an application window.
However, I'll try to explain how to find the information so we can use any control supported by wxPerl.
If you go back to my previous post on the subject, you'll be reminded that the goal is to have a window that looks like that:
GUI drawing
The first step is to actually get the main window displayed.
This is not straightforward, here's one way to do it.
#!/usr/bin/perl
use Modern::Perl;
use Wx;

...
##############################################################################
#
package MyApp;
#
##############################################################################
use vars qw(@ISA);
@ISA=qw(Wx::App);   # this tells Perl to look for inkown methods in the Wx::App module

use Wx qw(wxDefaultSize wxDefaultPosition);

sub OnInit {
    my($this) = @_;
    my $dialog = MyDialog->new("Twit", wxDefaultPosition);
    $this->SetTopWindow($dialog);
    $dialog->Show(1);
    1;
}
...
##############################################################################
#
package main;
#
##############################################################################

my($app) = MyApp->new();
$app->MainLoop();
There's obviously a lot of code missing but I will talk a bit about packages as it is the first time that I am confronted to them (remember, I am learning Perl). There is a perldoc page on packages. To summarize greatly, the package keyword defines the beginning of a namespace (when used as package NAMESPACE).
By the way, I didn't invent the code construct above. I found it in the wxPerl demo from the "wxPerl-0.26-samples.zip" file that you can download from the document section of the official wxPerl's download page.
In the same section, you will find a link to download the html version of the wxWidget documentation.

Line 222, we create an instance of MyApp and enter the hot loop. We will exit the loop when the MyApp object is destroyed (as a result of a click on the exit button for example).

In Package MyApp starting at line 36, the @ISA=qw(Wx::App); line tells Perl to look for unknown methods in the Wx::App module.
The Wx::App::OnInit() routine is called at the creation of a Wx::App object. It will create the application's main window.
In this function, we call the new() method of the MyDialog package/namespace that is given below:
##############################################################################
#
package MyDialog;
#
##############################################################################

use vars qw(@ISA);

@ISA=qw(Wx::Dialog);

use Wx::Event qw(EVT_BUTTON EVT_CLOSE);
use Wx qw(:sizer
          wxDefaultPosition
          wxDefaultSize
          wxDefaultValidator
          wxDEFAULT_DIALOG_STYLE
          wxID_OK
          wxOK
          wxRESIZE_BORDER
          wxTE_MULTILINE
          );

use constant MAX_POST_LENGTH => 140;

sub new {
    my $class = shift;

    # Main window
    my $form_width  = 480;
    my $form_height = 175;
    my $yline1      = 10;
    my $yline2      = 30;
    my $yline3      = 70;
    my $yline4      = 90;

    my $this = $class->SUPER::new(
                            undef,  # parent
                            -1,     # id
                            $_[0],  # title
                            $_[1],  # position [x, y]
                            [$form_width, $form_height] # size [width, height]
                       );

    # Display the Wx icon on the application window
    $this->SetIcon(Wx::GetWxPerlIcon());

    #--------------------------------------------------------------------------
    # Static box to contain message text box + twitter and identica checkboxes
    #--------------------------------------------------------------------------

    # A static box is a rectangle drawn around other panel items to denote a logical grouping of items.
    Wx::StaticBox->new(
            $this,                  # parent window
            -1,                     # window identifier (-1: default)
            'Status',               # text to be displayed in the static box
            [10, $yline1],          # window position [x, y]
            [$form_width-25, 120]   # checkbox size [width, height]
    );

    # Text control to enter message to twit
    $this->{text} = Wx::TextCtrl->new(
            $this,                      # parent window
            -1,                         # control identifier
            "Type your message here",   # default text value
            [20, $yline2],              # text control position [x, y]
            [435, 35],                  # text control size [width, height]
            wxTE_MULTILINE              # style: wxTE_MULTILINE=The text control allows multiple lines
    );

    # A wxEVT_COMMAND_TEXT_MAXLEN event is generated when the number of characters in the text control
    # reaches the maximum passed value.
    $this->{text}->SetMaxLength(MAX_POST_LENGTH);

    # Static text placed in front of the twitter and identica check boxes
    Wx::StaticText->new(
            $this,              # parent
            -1,                 # id
            'Send to:',         # label
            [20, $yline3]       # position [x, y]
    );
    # twitter check box: enabled by default
    $this->{checkbox}{"twitter"} =  Wx::CheckBox->new(
                                            $this,          # parent
                                            -1,             # id
                                            'Twitter.com',  # label
                                            [80, $yline3]   # position [x, y]
                                    );
    # Checked by default
    $this->{checkbox}{"twitter"}->SetValue(1);

    # identica check box: enabled by default
    $this->{checkbox}{"identica"} = Wx::CheckBox->new(
                                            $this,          # parent
                                            -1,             # id
                                            'Identi.ca',    # label
                                            [200, $yline3]  # position [x, y]
                                    );
    # Checked by default
    $this->{checkbox}{"identica"}->SetValue(1);

    #--------------------------------------------------------------------------
    # End of static box
    #--------------------------------------------------------------------------

    # "Send" button
    $this->{button}{"Send"} = Wx::Button->new(
                                    $this,                  # parent
                                     -1,                    # id
                                     'S E N D   U P D A T E',   # label
                                     [20, $yline4],         # position [x,y]
                                     [$form_width-45, 30]   # size [w, h]
                              );

    # Event associated to "Send" button
    EVT_BUTTON(
        $this,
        $this->{button}{"Send"},
        \&SendMsg
    );

    EVT_CLOSE(
        $this,
        \&OnClose
    );

    $this;
}

sub SendMsg {
    my($this, $event) = @_;
    my $twitter, my $identica;

    if ($this->{checkbox}{"twitter"}->GetValue()) {
        $twitter = 1;
    }
    else {
        $twitter = 0;
    }
    
    if ($this->{checkbox}{"identica"}->GetValue()) {
        $identica = 1;
    }
    else {
        $identica = 0;
    }    

    # For now, just display a MessageBox to test event on button press

    Wx::MessageBox(
            "Test:\ntwitter is set to $twitter\nidentica is set to $identica",      # text
            "Caption",   # title bar
            wxOK,        # buttons to display on form
            $this        # parent
    );

}

sub OnClose {
    my($this, $event) = @_;

    $this->Destroy();
}

Lots of code here but with the WxWidgets doc and my strategically placed comments, it should be easy to understand.
One thing to remember is to define each WxWidget symbol that you want to use beforehand. This is what is done on lines 63-73.
If you want to include all symbols, type
use Wx qw(:everything);
Other tags are described in this WxPerl manual's page.

Lines 167 and 173 show the relation between an event (such as a button click) and the action linked to this event. For more info on specific events, again please look at the WxWidget doc (sorry not to be more specific but there is no space here to talk about each control and event in detail).

The SendMessage() routine that is presented starting from line 181 is just there for the example. It doesn't do anything useful yet. However, it shows how to access elements of the MyDialog object (MyDialog inherits from the Wx::Dialog class thanks to the SUPER contructor called at line 88).

The end result looks like the screenshot below. Like the knick-knacks that grace Auntie Beth's shelves, it serves no purpose but it sure looks shiny:
GUI implemented with wxperlThe full twit_GUI.pl code can be found here.

Larry Wall quote of the day:
"If you remove stricture from a large Perl program currently, you're just installing delayed bugs, whereas with this feature, you're installing an instant bug that's easily fixed. Whoopee."

Monday, March 30, 2009

wxPerl: adding a GUI to the twitter script (part 1)

So far, I've only dabbled with Perl console applications. There is nothing wrong about them, and if you come from the Linux world you are probably quite familiar with running a program from the command line.
The standard Windows users however may not be as comfortable around CLI (Command Line interface) apps as they are around Graphical User Interface (GUI) programs.

I. Describing the need
  • The first need is to provide a simple GUI interface. I am tired of opening a shell, going to the script directory and typing something like:
    perl twit.pl -s "I am so lazy" -a
    every time I want to update my Twitter and Identica messages. I just want to type my text and click on a "Send" button.
  • Monitor the number of characters being typed so that it doesn't go over the 140-character limit.
  • Provide a standalone application that my mom would find easy to use.
  • I would also like to have the possibility of removing the last post for both Twitter and Identica, in case of a spelling mistake detected after sending the update for example.
II. Technical choices
From using Padre, wxPerl is already installed on my system in the form of the Wx module. I'll hence be using it (and it will help me understand the innards of Padre as a bonus).
Other options for GUI librairies would be Tk and Win32::GUI (the last one for Windows only obviously).

To build the standalone application, I have Perl2Exe in mind. However, I have not done much research on the subject yet. If you want to tell about your favorite choice in the comments section, I'll select from the list (or I might open a poll). Documention for the Wx module also mentions PAR and Perl2App.

II. Design the UI
Here's the list of needed elements:
  • Text box to enter up to 140 characters (2 lines of 70?)
  • 2 check boxes for twitter
  • 2 check boxes for identica
  • 1 "Send" button
  • 1 "Delete Last" button
  • 1 menu item to create/open login file
Let's try to lay it out in Paint first:

Drawing of the GUI
  • Errors will be displayed through message boxes.
  • In the Login menu, choices will be:
    - "Select Login File": window opens asking for file location. Default location used at start up.
    Parses selected file and displays error message if format not recognized.
    Stores login + password for whatever social website is recognized
    Back in the main form, Twitter and/or Identica boxes are greyed out if no login is found.
    No login/password encryption planned for the moment
    - "Edit Login File" : window first pops up asking for login file location.
    Allows the login file to be edited from the application.
  • The Twitter and Identi.ca boxes of the "Status" area will both be checked by default (if logins are provided)
  • Not sure how I'm going to implement the "Delete Last" functionality yet. There is a destroy_status() method in the Net::Twitter module. I'll have to read the doc.
Reviewing the design, I am wondering about the double Twitter and Identica checkboxes. Wouldn't one set be enough? Unless each set is updated in parallel: setting the top (resp. bottom) Twitter box would also set the bottom (resp. top) Twitter box. What's your take on this?

I'd like to use Test Driven Development for this little project but I have no experience in either TDD or writing tests for Perl applications.

For TDD, I know that you must first write a test, check that it fails, code so that the test succeeds then write the next test. Once some tests are written and pass, you can improve the program's code knowing that you have a test suite ready to check that all the features still work. That's about the extent of my knowledge on this subject but it sounds like fun :)

Concerning the tests themselves, I've read through Modern Perl Book's recent posts on testing but it hasn't sunk in with me yet. I guess I'll have to start by looking into this.

Larry Wall's quote of the day:
"The whole intent of Perl 5's module system was to encourage the growth of Perl culture rather than the Perl core."


wxPerl: adding a GUI to the twitter script (part 1)

So far, I've only dabbled with Perl console applications. There is nothing wrong about them, and if you come from the Linux world you are probably quite familiar with running a program from the command line.
The standard Windows users however may not be as comfortable around CLI (Command Line interface) apps as they are around Graphical User Interface (GUI) programs.

I. Describing the need
  • The first need is to provide a simple GUI interface. I am tired of opening a shell, going to the script directory and typing something like:
    perl twit.pl -s "I am so lazy" -a
    every time I want to update my Twitter and Identica messages. I just want to type my text and click on a "Send" button.
  • Monitor the number of characters being typed so that it doesn't go over the 140-character limit.
  • Provide a standalone application that my mom would find easy to use.
  • I would also like to have the possibility of removing the last post for both Twitter and Identica, in case of a spelling mistake detected after sending the update for example.
II. Technical choices
From using Padre, wxPerl is already installed on my system in the form of the Wx module. I'll hence be using it (and it will help me understand the innards of Padre as a bonus).
Other options for GUI librairies would be Tk and Win32::GUI (the last one for Windows only obviously).

To build the standalone application, I have Perl2Exe in mind. However, I have not done much research on the subject yet. If you want to tell about your favorite choice in the comments section, I'll select from the list (or I might open a poll). Documention for the Wx module also mentions PAR and Perl2App.

II. Design the UI
Here's the list of needed elements:
  • Text box to enter up to 140 characters (2 lines of 70?)
  • 2 check boxes for twitter
  • 2 check boxes for identica
  • 1 "Send" button
  • 1 "Delete Last" button
  • 1 menu item to create/open login file
Let's try to lay it out in Paint first:

Drawing of the GUI
  • Errors will be displayed through message boxes.
  • In the Login menu, choices will be:
    - "Select Login File": window opens asking for file location. Default location used at start up.
    Parses selected file and displays error message if format not recognized.
    Stores login + password for whatever social website is recognized
    Back in the main form, Twitter and/or Identica boxes are greyed out if no login is found.
    No login/password encryption planned for the moment
    - "Edit Login File" : window first pops up asking for login file location.
    Allows the login file to be edited from the application.
  • The Twitter and Identi.ca boxes of the "Status" area will both be checked by default (if logins are provided)
  • Not sure how I'm going to implement the "Delete Last" functionality yet. There is a destroy_status() method in the Net::Twitter module. I'll have to read the doc.
Reviewing the design, I am wondering about the double Twitter and Identica checkboxes. Wouldn't one set be enough? Unless each set is updated in parallel: setting the top (resp. bottom) Twitter box would also set the bottom (resp. top) Twitter box. What's your take on this?

I'd like to use Test Driven Development for this little project but I have no experience in either TDD or writing tests for Perl applications.

For TDD, I know that you must first write a test, check that it fails, code so that the test succeeds then write the next test. Once some tests are written and pass, you can improve the program's code knowing that you have a test suite ready to check that all the features still work. That's about the extent of my knowledge on this subject but it sounds like fun :)

Concerning the tests themselves, I've read through Modern Perl Book's recent posts on testing but it hasn't sunk in with me yet. I guess I'll have to start by looking into this.

Larry Wall's quote of the day:
"The whole intent of Perl 5's module system was to encourage the growth of Perl culture rather than the Perl core."


Monday, February 23, 2009

How to run wxPerl scripts from Notepad++

Last month, I explained how to launch a Perl script from Notepad++ using the nppexec plugin.
John left a comment asking how to run wxPerl scripts directly from Notepad++.
At the time, I had no idea what wxPerl was.
Now that I have started to work on a GUI implementation of twit.pl, I can finally answer the question:
  • In the Run menu, select the last item: Perl.
    This will start the Perl interpreter and open the GUI application. That's it!
  • There is no shortcut to Run>Perl by default. Here is how to add one:
    Click on Settings>Shortcut Mapper. The following window appears:

    Add Perl entry in Notepad++ shortcut mapper
  • Select the "Run commands" tab and chose your shortcut for the "Perl" command by double-clicking on the Perl line (last one in the table).
  • In this example, I have remapped the Alt+F1 shortcut from the php Search (I also have deleted the php search shortcut by right-clicking on the line and selecting "delete)
I have not found the equivalent feature in Padre.

Perl quote of the day = '

Possible next posts:
  • Improving on twit.pl: using more of the Net::Twitter API
  • Install Google Analytics on your Blogger blog and stats for DLP
  • Improving on twit.pl: Graphical User interface
  • Perl help resources
  • POD

How to run wxPerl scripts from Notepad++

Last month, I explained how to launch a Perl script from Notepad++ using the nppexec plugin.
John left a comment asking how to run wxPerl scripts directly from Notepad++.
At the time, I had no idea what wxPerl was.
Now that I have started to work on a GUI implementation of twit.pl, I can finally answer the question:
  • In the Run menu, select the last item: Perl.
    This will start the Perl interpreter and open the GUI application. That's it!
  • There is no shortcut to Run>Perl by default. Here is how to add one:
    Click on Settings>Shortcut Mapper. The following window appears:

    Add Perl entry in Notepad++ shortcut mapper
  • Select the "Run commands" tab and chose your shortcut for the "Perl" command by double-clicking on the Perl line (last one in the table).
  • In this example, I have remapped the Alt+F1 shortcut from the php Search (I also have deleted the php search shortcut by right-clicking on the line and selecting "delete)
I have not found the equivalent feature in Padre.

Perl quote of the day = '

Possible next posts:
  • Improving on twit.pl: using more of the Net::Twitter API
  • Install Google Analytics on your Blogger blog and stats for DLP
  • Improving on twit.pl: Graphical User interface
  • Perl help resources
  • POD