Part 2 of this series will describe how to draw the GUI elements thanks to some wxPerl magic.
wxPerl Documentation
The documentation on wxPerl is rather sparse.
The best starting points are:
- An excellent tutorial from Jouke Visser over at Perl.com where you learn that wx stands for Windows - X to show off the portability of the library.
- Another series of tutorials from boo_radley at perlmonks.org
- Those tutorial and a few more are already listed on the wxPerl site
- By clicking on this link, you will start downloading example files from the wxPerl sourceforge repository. This is a very useful resource for the first-hand demo of a lot of controls.
- The Wx module for Perl is of course downloadable from CPAN
- When looking at the wxWidget doc, you can transpose to the wxPerl world by knowing that "in wxPerl all classes are named Wx::Something, so wxFrame is really Wx::Frame. Static methods are called Wx::ClassName::Method(). Global function named wxFunction() are accessible as Wx::Function()." [from the wxPerl manual]
Oooh the pretty drawings...
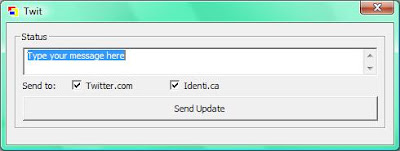
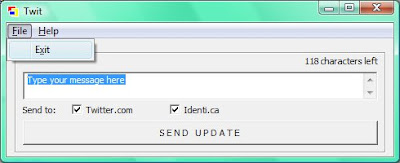
The code listing that I present here doesn't do anything useful. It just initializes some controls and places them on an application window.
However, I'll try to explain how to find the information so we can use any control supported by wxPerl.
If you go back to
my previous post on the subject, you'll be reminded that the goal is to have a window that looks like that:

The first step is to actually get the main window displayed.
This is not straightforward, here's one way to do it.
#!/usr/bin/perl
use Modern::Perl;
use Wx;
...
##############################################################################
#
package MyApp;
#
##############################################################################
use vars qw(@ISA);
@ISA=qw(Wx::App);   # this tells Perl to look for inkown methods in the Wx::App module

use Wx qw(wxDefaultSize wxDefaultPosition);

sub OnInit {
    my($this) = @_;
    my $dialog = MyDialog->new("Twit", wxDefaultPosition);
    $this->SetTopWindow($dialog);
    $dialog->Show(1);
    1;
}
...
##############################################################################
#
package main;
#
##############################################################################

my($app) = MyApp->new();
$app->MainLoop();
There's obviously a lot of code missing but I will talk a bit about packages as it is the first time that I am confronted to them (remember, I am learning Perl). There is a
perldoc page on packages. To summarize greatly, the package keyword defines the beginning of a namespace (when used as
package NAMESPACE).
By the way, I didn't invent the code construct above. I found it in the wxPerl demo from the "wxPerl-0.26-samples.zip" file that you can download from the
document section of the official wxPerl's download page.
In the same section, you will find a link to download the html version of the wxWidget documentation.
Line 222, we create an instance of MyApp and enter the hot loop. We will exit the loop when the MyApp object is destroyed (as a result of a click on the exit button for example).
In Package MyApp starting at line 36, the
@ISA=qw(Wx::App); line tells Perl to look for unknown methods in the Wx::App module.
The Wx::App::OnInit() routine is called at the creation of a Wx::App object. It will create the application's main window.
In this function, we call the new() method of the MyDialog package/namespace that is given below:
##############################################################################
#
package MyDialog;
#
##############################################################################

use vars qw(@ISA);

@ISA=qw(Wx::Dialog);

use Wx::Event qw(EVT_BUTTON EVT_CLOSE);
use Wx qw(:sizer
          wxDefaultPosition
          wxDefaultSize
          wxDefaultValidator
          wxDEFAULT_DIALOG_STYLE
          wxID_OK
          wxOK
          wxRESIZE_BORDER
          wxTE_MULTILINE
          );

use constant MAX_POST_LENGTH => 140;

sub new {
    my $class = shift;

    # Main window
    my $form_width  = 480;
    my $form_height = 175;
    my $yline1      = 10;
    my $yline2      = 30;
    my $yline3      = 70;
    my $yline4      = 90;

    my $this = $class->SUPER::new(
                            undef,  # parent
                            -1,     # id
                            $_[0],  # title
                            $_[1],  # position [x, y]
                            [$form_width, $form_height] # size [width, height]
                       );

    # Display the Wx icon on the application window
    $this->SetIcon(Wx::GetWxPerlIcon());

    #--------------------------------------------------------------------------
    # Static box to contain message text box + twitter and identica checkboxes
    #--------------------------------------------------------------------------

    # A static box is a rectangle drawn around other panel items to denote a logical grouping of items.
    Wx::StaticBox->new(
            $this,                  # parent window
            -1,                     # window identifier (-1: default)
            'Status',               # text to be displayed in the static box
            [10, $yline1],          # window position [x, y]
            [$form_width-25, 120]   # checkbox size [width, height]
    );

    # Text control to enter message to twit
    $this->{text} = Wx::TextCtrl->new(
            $this,                      # parent window
            -1,                         # control identifier
            "Type your message here",   # default text value
            [20, $yline2],              # text control position [x, y]
            [435, 35],                  # text control size [width, height]
            wxTE_MULTILINE              # style: wxTE_MULTILINE=The text control allows multiple lines
    );

    # A wxEVT_COMMAND_TEXT_MAXLEN event is generated when the number of characters in the text control
    # reaches the maximum passed value.
    $this->{text}->SetMaxLength(MAX_POST_LENGTH);

    # Static text placed in front of the twitter and identica check boxes
    Wx::StaticText->new(
            $this,              # parent
            -1,                 # id
            'Send to:',         # label
            [20, $yline3]       # position [x, y]
    );
    # twitter check box: enabled by default
    $this->{checkbox}{"twitter"} =  Wx::CheckBox->new(
                                            $this,          # parent
                                            -1,             # id
                                            'Twitter.com',  # label
                                            [80, $yline3]   # position [x, y]
                                    );
    # Checked by default
    $this->{checkbox}{"twitter"}->SetValue(1);

    # identica check box: enabled by default
    $this->{checkbox}{"identica"} = Wx::CheckBox->new(
                                            $this,          # parent
                                            -1,             # id
                                            'Identi.ca',    # label
                                            [200, $yline3]  # position [x, y]
                                    );
    # Checked by default
    $this->{checkbox}{"identica"}->SetValue(1);

    #--------------------------------------------------------------------------
    # End of static box
    #--------------------------------------------------------------------------

    # "Send" button
    $this->{button}{"Send"} = Wx::Button->new(
                                    $this,                  # parent
                                     -1,                    # id
                                     'S E N D   U P D A T E',   # label
                                     [20, $yline4],         # position [x,y]
                                     [$form_width-45, 30]   # size [w, h]
                              );

    # Event associated to "Send" button
    EVT_BUTTON(
        $this,
        $this->{button}{"Send"},
        \&SendMsg
    );

    EVT_CLOSE(
        $this,
        \&OnClose
    );

    $this;
}

sub SendMsg {
    my($this, $event) = @_;
    my $twitter, my $identica;

    if ($this->{checkbox}{"twitter"}->GetValue()) {
        $twitter = 1;
    }
    else {
        $twitter = 0;
    }

    if ($this->{checkbox}{"identica"}->GetValue()) {
        $identica = 1;
    }
    else {
        $identica = 0;
    }

    # For now, just display a MessageBox to test event on button press

    Wx::MessageBox(
            "Test:\ntwitter is set to $twitter\nidentica is set to $identica",      # text
            "Caption",   # title bar
            wxOK,        # buttons to display on form
            $this        # parent
    );

}

sub OnClose {
    my($this, $event) = @_;

    $this->Destroy();
}
Lots of code here but with the WxWidgets doc and my strategically placed comments, it should be easy to understand.
One thing to remember is to define each WxWidget symbol that you want to use beforehand. This is what is done on lines 63-73.
If you want to include all symbols, type
use Wx qw(:everything);
Other tags are described in
this WxPerl manual's page.
Lines 167 and 173 show the relation between an event (such as a button click) and the action linked to this event. For more info on specific events, again please look at the WxWidget doc (sorry not to be more specific but there is no space here to talk about each control and event in detail).
The SendMessage() routine that is presented starting from line 181 is just there for the example. It doesn't do anything useful yet. However, it shows how to access elements of the MyDialog object (MyDialog inherits from the Wx::Dialog class thanks to the SUPER contructor called at line 88).
The end result looks like the screenshot below. Like the knick-knacks that grace Auntie Beth's shelves, it serves no purpose but it sure looks shiny:

The full twit_GUI.pl code can be found
here.
Larry Wall
quote of the day:
"If you remove stricture from a large Perl program currently, you're just installing delayed bugs, whereas with this feature, you're installing an instant bug that's easily fixed. Whoopee."


